
Step-By-Step Guide: How to Make a Flat Roof Using Fibreglass
Correct and successful installation of glass fibre (fibreglass – or GRP) flat roof requires an organised approach, good surface preparation, understanding of the materials in use and procedures and of course, appropriate weather.
If any of these are absent you are unlikely to achieve a long term satisfactory result.
What is a fibreglass flat roof?
A fibreglass flat roof refers to the protective waterproofing membrane installed on top of the insulating and wooden support layers of a flat roof.
What is fibreglass?
Fibreglass is a composite material – a mixture of polyester resin and glass fibre matting. These components complement each other, creating a strong, lightweight, highly durable and water-resistant structure, making it perfect for flat roofing applications.
Note: The term ‘fibreglass’ refers to the resultant composite. Other terminology like ‘GRP’, short for ‘glass reinforced polyester’ and even glass fibre (often confused with the reinforcement material).
Is fibreglass a good roofing material?
Undoubtedly, yes. When installed correctly it is the most durable of flat roofing systems. At Strandek, our team have been installing fibreglass flat roofing systems since 1976. The expected lifetime is over 30 years.
In fact, space agencies, automotive manufacturers, yacht builders and the military have all used fibreglass for structural applications in the sea, on the roads, in the air and in space!
When installing fibreglass, it’s important to get the laminating procedure right. That’s why we’ve outlined a detailed series of instructions for you to follow.
What type of fibreglass is best for me?
There are several types of fiberglassing layers. These are determined by the thickness of the glass fibre reinforcement, which is typically 450, 600 or 2 x 450-gram layers of chopped strand matting (CSM). 450 gram CSM is usually a little too thin (it cannot tolerate foot traffic well), whilst 600 gram CSM is usually preferred as it can tolerate foot traffic and is easier to install. Two layers of glass fibre at 450 gram CSM can also be used, but they are often a little more time-consuming.
What materials, equipment and precautions are needed?
Materials
- Glass fibre matting (600 gram CSM)
- Unsaturated polyester resin (more commonly known as polyester resin)
- MEKP catalyst (used to cure the polyester resin)
- Acetone (for cleaning and diluting resin)
- Polyester resin topcoat
- GRP edge trims (structural supports to be installed around the edges of the roof)
Equipment
In addition to skill, the application of fibreglass to a surface requires the correct equipment. In our experience, the following are recommended:
- Sheep’s wool roller (not a foam roller – this will dissolve in resin) – and handles!
- Paddle roller (metal roller with grooves used to drive out excess air and resin from laminated glass fibre).
- Hand cleaner
- Sandpaper
- Clout nails (for edge trims)
- Stanley knife
- Catalyst dispenser
- Paintbrush – for complex detailing
- Clean mixing buckets – for mixing catalyst with resin
- Clean mixing tools
Safety equipment
- Emergency eyewash
- Gloves
- Hi-vis jacket
- Goggles
- Hard hat helmet
- Dust/chemical mask
Precautions: health and safety
Flat roofing with fibreglass materials has several hazards that should be accounted for:
- Working at height
- Manual handling
- Asbestos risks
- Chemical exposure (via resin and solvents) – generally low as the work is outside.
Therefore, ladders, gloves, goggles, overalls and a protective mask are all highly recommended. Furthermore, an asbestos assessment and survey is recommended for properties older than 2001 and scaffolding is recommended for safety to prevent falls from height. Emergency eyewash should also be available at all times.
Consider assessing the roof for potential hazards. This should entail a series of construction considerations and level of paperwork in advance, centring on a method statement, risk assessment and COSHH form. The UK HSE site on roof building provides more detailed information.
Surface Preparation
We’ll assume that you have installed a layer of timber decking to consist of 18 mm OSB3 Sterling Board (preferably 8x 2 interlocking).
Note: plywood is often used as a cheaper alternative. This is not recommended as it is less durable than timber and offers poor adhesion – unless a G4 primer is used in advance.

Some surface preparation from a structural perspective is required in advance. This can usually be summarised as:
- Timber decking should be secured to falls using 21 fixings per board secured into the joists
- Fill and fair any obvious gaps (a perimeter gap against a wall abutment up to 20 mm is acceptable).
- On the gutter, elevation fix a 50 x 50 tanalised batten onto the fascia and flush with the top of the decking board. This provides support for the edge trims overhanging the gutter and provides correct alignment.
The next section concerns the glass fibre installation.
Glass Fibre Installation
A dedicated mixing and decanting area with a protective groundsheet or board to contain spillages should be established together with a secure worktop.
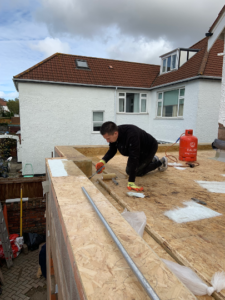
The quantities of materials used will depend on the size of the roof and your supplier will be able to advise accordingly.
Laminating Procedure
1. Start by securely fixing the appropriate edge trims to all perimeters including wall abutment upstands.
Note: these are available in 3 m lengths and various profiles to suit.
2. Cut and mitre all corners ready for neatly joining with laminate.
Note: the glass mat is usually 920 mm wide and the preferred gauge is 600 gram per square meter matting.
Note: 450 gram per square meter matting is sometimes used, but this is not recommended as it is a little too thin and cannot tolerate foot traffic unless you use two layers. 600 gram CSM is usually preferred.
3. Carefully measure your roof and cut the matting to size. Allow approximately a 50mm overlap on the joints. Lay the mat on top of the horizontal aspect of the trim only…not over the vertical edge.
Note: it is recommended to undertake the smaller detailing work first such as joints, upstands, outlets (if through a parapet or into a downpipe outlet) first using a small quantity resin mix.
Quite often, and depending on roof size it pays to work in a team of two. One can be providing mixed resin, clean tools, dealing with minor issues allowing the ‘ laminator’ to progress unhindered and without pressure. The second operative can step in and assist also with laying the mat and paddle rolling following resin application.
How much resin do I need per square meter of 600 gram mat?
A 600 gram CSM generally requires 1.5 L of resin, so mixing 10 L resin will provide around 6 sq.m of roof surface.
Note: it is highly recommended that you work in manageable amounts; catalysed polyester resin will begin to cure. This will impact the quality of the resin, so always dispense the resin into a separate mixing bucket and then catalyse.
Note: this, with appropriate catalyst quantity depending on ambient temperature, is quite manageable for two operatives and can be laid comfortably inside 15 minutes. If you are not confident with that quantity then initially halve it and assess your progress building from there.
4. An initial coating of resin should be applied to the immediate area to be worked on ( ie, size of mat cut), followed by laying down the mat and further resin applied to it.
Note: an emulsion binds the strands together and after a minute or so this emulsion breaks down and allows the use of the paddle roller to consolidate the laminate.
Note: the surface should not be ‘flooded’ with resin….evidence of this is not just visual; you will find that the roller will tend to plough up the surface. Conversely, too dry a laminate will be obvious with a substantial lack of breakdown of emulsion and resultant surface strands. If the quantities described above are adhered to then neither of these defects should happen.
Note: if you find that the resin is setting too quickly… this will become more evident in the bucket mix… dispose and mix a fresh batch considering a little less catalyst.
5. Continue to treat all areas as described. Once all timber surfaces have been coated, allow the resin to cure to a point where you are able to walk on it without sticking to shoe soles.
6. Continue by checking the entire surface for any defects, e.g. pinholes, dry laminate, protruding strands of the cured mat, unsecured laminate to boards. Correct all errors by cutting out ( grinder), sanding back and patch laminating. Pinholes can be resin overcoated.
7. Once fully cured a superior final finish can be achieved by lightly sanding the whole laminated surface and removing any superficial debris. This can be better achieved when the laminate has sufficiently hardened and is not an exhaustive procedure.
Finally, you are now ready for the flow coat application.
Flow coat (topcoat) application
Flow coat provides a UV protective coating together with aesthetics and may be selected from a choice of colours. Non-slip aggregate is available for intended walk areas like balconies, walkways or terraces.
This application is relatively quick but it is recommended to undertake awkward surfaces and edge trims before the main roof surface with a small quantity mix.
This can be applied by roller or brush depending on the size. Take care to protect fascia and adjacent structures (and vehicles) from splashes.
Note: Approximately 1 L of flow coat will cover approximately 2 sq.m of the surface. Again, according to temperatures and required rate of cure appropriate catalyst should be added and thoroughly mixed. Discuss with your supplier.
1. Taking account of your roof size, mix an appropriate quantity of flow coat and catalyst.
2. One operative should be able to comfortably apply 10 sq.m of flat roof surface in 10 minutes using a new roller refill.
3. Again adjust mix quantity to suit your anticipated rate of application and once applied, allow to cure for up to 24 hours.
Note: flow coat will begin to exotherm and set (cure or harden) in the bucket before on the roof (faster than resin). Do not continue use if this occurs and beware the roller will also set, so stop rolling on the roof surface and mix a new batch with a new roller.
Note: it is not recommended to apply flow coat onto hot surfaces (those estimated to be over 30 degrees Celsius) as this can inhibit cure and leave a tacky surface.
Note: do not apply if surfaces are frosted or wet or in low temperatures. This again will result in a sub-standard installation; moisture from the frost will affect the adhesion of the resin and low temperatures will interfere with the curing process.
Note: if the above general guide is adhered to you will have the benefit of a well-installed fibreglass flat roof that will provide many years of protection. In our experience, a correctly installed fibreglass flat roof should provide 30+ years of protection.
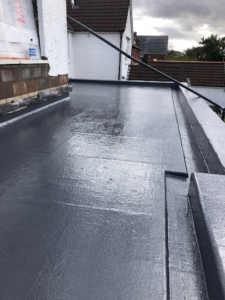
A bit more detail about the materials used…
Absolutely essential…not only for correct results but from a safety perspective.
Always request safety sheets detailing safe handling of all materials employed and take the time to read them. These are now usually available online.
Observe the cautions highlighted and handle accordingly. Examples are acetone…highly flammable and harmful for skin contact, catalyst ( organic peroxide) harmful to skin, potential self combustible when left in mop-up cloths, harmful with eye contact, the resin is an irritant, combustible and produces harmful vapours in confined areas.
Understand the procedure for disposal of unused mixed resin or flow coat….a potential fire hazard and never ever pour down a drain.
Understand the correct mixing procedures, quantities required for the area immediately working on, working time available versus temperatures….a hot day will reduce working material time and less catalyst will be required. A cold day will extend cure times. A wet day will ruin your installation. Remember to protect the timber decking from rainwater exposure at all times.
Note: a good supplier of materials will spend time with you explaining these requirements and will have first-hand knowledge from hands-on experience over many years. We recommend Resin Library as fibreglass material suppliers.
Frequently Asked Questions
Q. Why should I consider fibreglass over other types of roofing membrane?
A. Despite the availability of a huge array of membranes, fibreglass remains structurally the most durable, tough and versatile waterproof roof coating.
Q. Why is Fibreglass used in the construction industry?
A. Fibreglass has superior engineering properties, design flexibility is easy to mould and demonstrates high chemical resistance, making it perfect for a range of projects. It combines several desired qualities like a high strength-to-weight ratio, toughness, chemical resistance, electrical properties, aesthetics. These make it ideal for flat roofing and other building projects.
Q. Do Strandek GRP Systems operate nationally?
A. Yes we do and are selected for very prestigious bespoke installations due to our outstanding proven track record since 1976.
Q. How old are your earliest installations?
In 1978 we successfully installed over 3000 Lm of fibreglass gutter linings at Plymouth Royal Naval Dock Yards.
Q. Is EPDM better than Fibreglass?
A. No. EPDM is a rubber-like sheet that has the capacity to tear and puncture – like the inner tube on a bicycle – leading to leakage. It’s preferred to fibreglass because it’s easy to install, but it doesn’t last as long. Fibreglass is a composite used to build spacecraft, that’s stronger than certain types of steel. It’s also been shown to resist high-impact.
Q. How would you describe the future for Strandek GRP Systems in relation to customer confidence?
With 50 years approaching as a continuous trading company specialising in the glass fibre industry we have substantially invested in the next stage of our future which will greatly expand the range of products and services to the same high standards.
Q.What do you consider to be the primary requirement for a long-established company?
Obviously, a great product and service are essential but we firmly believe that at the very top has to be communication with the client. This is vital and forms the foundation of a relationship. Regular updating on the progress of work including attendance dates, any changes due weather. Essentially never ever keep the customer uninformed.
Hi a question ,once I have done my trims and joints with bandage ,is there a strict time ,needed before I mat up the full roof ,does the joints need to be still tacky or is it ok for them to be fully gone off
You should be fine applying the matting over the bandage-covered roof when it is tacky. Just make sure you do not move the matting in a way that dislodges the bandages. If they are fully gone off, just ensure they are clean – perhaps use an acetone wipe and apply a thin layer of resin in advance to maximize adhesion.